
Building a 5G Lab with free5GC and UERANSIM
Revisit a complete 2020 5G lab: kernel and dependencies, free5GC and UERANSIM builds, subscribers, and PDU sessions.
In this article
This walkthrough builds a complete experimental 5G mobile network using the open-source free5GC core and UERANSIM, a simulator for user equipment and radio access. After starting both sides, the final check is an established PDU session and successful connectivity.
The commands document the December 2020 lab, including free5GC v3.0.4, Go 1.14.4, and the UERANSIM interface available then. They are retained as a historical procedure, not silently replaced with commands for a different generation of the software.
Environment requirements
The free5GC documentation used for the original experiment recommended Ubuntu 18.04. Other operating systems could fail to compile the software or exhibit unexpected behavior. The gtp5g kernel module also needs a compatible kernel and matching development files.
Select a compatible kernel
Check the running kernel with uname -r. The original requirements identified 5.0.0-23 or a suitable 5.4-series-or-later kernel; arbitrary distribution builds were not guaranteed to compile the module successfully.
The lab installed the following image, modules, and headers:
sudo su -
apt-get install -qq \
        linux-image-5.0.0-23-generic \
        linux-modules-5.0.0-23-generic \
        linux-headers-5.0.0-23-generic \
        && grub-set-default 1 \
        && update-grub
GRUB normally selects a newer kernel by default. If installing an older kernel for this experiment, verify the boot menu selection and retain a known-working recovery kernel. Reboot into the intended kernel before building its module. The original notes suggested removing newer kernels; the important requirement is booting a compatible one, rather than indiscriminately deleting recovery options.
Install dependencies for free5GC and UERANSIM
Install the build tools, libraries, Java tools, and Go version used by the experiment:
sudo apt update

# Free5GC dependency packages
sudo apt install \
		git \
		build-essential \
		vim \
		strace \
		net-tools \
		iputils-ping \
		iproute2 \
        mongodb \
        wget \
        gcc \
        cmake \
        autoconf \
        libtool \
        pkg-config \
        libmnl-dev \
        libyaml-dev

# UERANSIM dependency packages
sudo apt install make g++ openjdk-11-jdk maven libsctp-dev lksctp-tools

wget https://dl.google.com/go/go1.14.4.linux-amd64.tar.gz
sudo tar -C /usr/local -zxvf go1.14.4.linux-amd64.tar.gz
mkdir -p ~/go/{bin,pkg,src}

echo 'export GOPATH=$HOME/go' >> ~/.bashrc
echo 'export GOROOT=/usr/local/go' >> ~/.bashrc
echo 'export PATH=$PATH:$GOPATH/bin:$GOROOT/bin' >> ~/.bashrc
source ~/.bashrc

# Check if Go installed with correct version
go version
The final go version check confirms which Go executable the shell is using. The environment variables put Go’s binary locations on the path for subsequent commands.
The UPF also needs to forward packets to the data network. The historical lab configured forwarding and masquerading as follows:
sudo sysctl -w net.ipv4.ip_forward=1
sudo iptables -t nat -A POSTROUTING -o {YOUR_DN_INTERFACE} -j MASQUERADE
sudo systemctl stop ufw
Replace {YOUR_DN_INTERFACE} with the interface leading to the data network. The last command stops UFW; it is preserved to explain the original isolated-lab configuration, not as a recommendation to disable a production firewall. A maintained environment should permit the required traffic deliberately.
Build and install the kernel module:
git clone https://github.com/PrinzOwO/gtp5g.git
cd gtp5g
make clean
make
sudo make install
The module must match the running kernel. A successful user-space build alone does not establish that the GTP data path can run.
Build free5GC and UERANSIM
Clone and compile the core network:
# Compile Free5GC
git clone --recursive -b v3.0.4 -j $(nproc) https://github.com/free5gc/free5gc.git
cd ~/free5gc
make all
Then build the simulator, using the Java location expected in the original environment:
# Compile UERANSIM
git clone https://github.com/aligungr/UERANSIM.git
cd ~/UERANSIM
export JAVA_HOME=/usr/lib/jvm/java-11-openjdk-amd64/
./build.sh
These commands reflect the repositories and build system at the time. In particular, newer UERANSIM releases may use a different build process and configuration format.
Start the core network and the simulator
1. Start the core and web console
Use two terminals so the core network and subscriber-management web console run separately:
# Use 2 terminals to run separate commands
# Free5GC core networks
./run.sh

# Free5GC web console, access the WebUI by localhost:5000
cd webconsole
go run server
The web console is accessed at localhost:5000 in this setup.
2. Select the free5GC simulator profile
In UERANSIM’s config/profile.yaml, choose the free5gc profile:
# Default possible profiles are:
#  - custom
#  - open5gs
#  - free5gc
#  - havelsan
# You can also create unlimited number of custom profiles by creating a folder for them.
selected-profile: 'free5gc'
The historical interface also listed custom, open5gs, and havelsan, and allowed additional profile directories. Selecting the correct profile aligns the simulator with the core-network configuration.
3. Add a subscriber
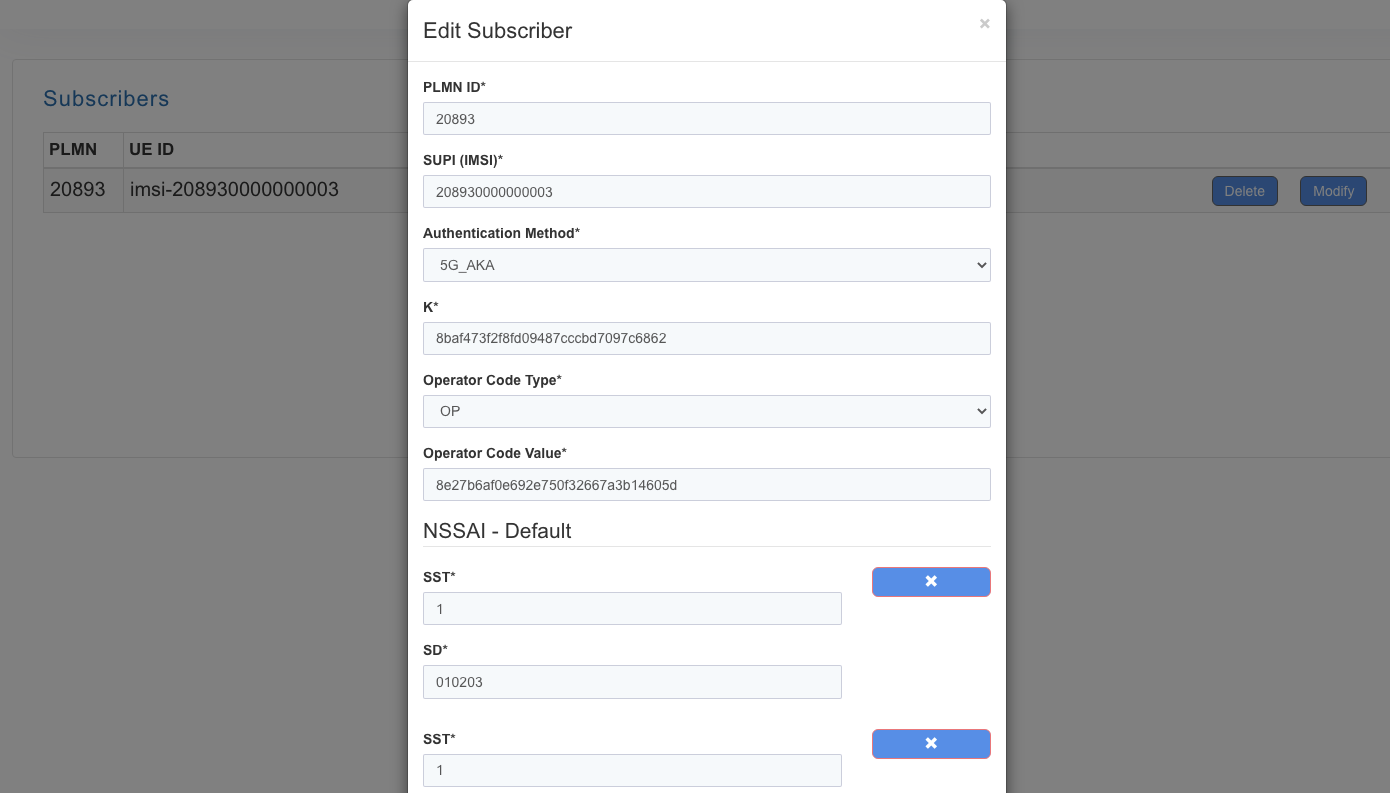
Open the free5GC web console and create a subscriber. The original UERANSIM profile expected OP authentication mode, so select OP rather than a different operator-code interpretation. Ensure the subscriber identity and authentication parameters correspond to the simulator’s configuration.
4. Establish a PDU session
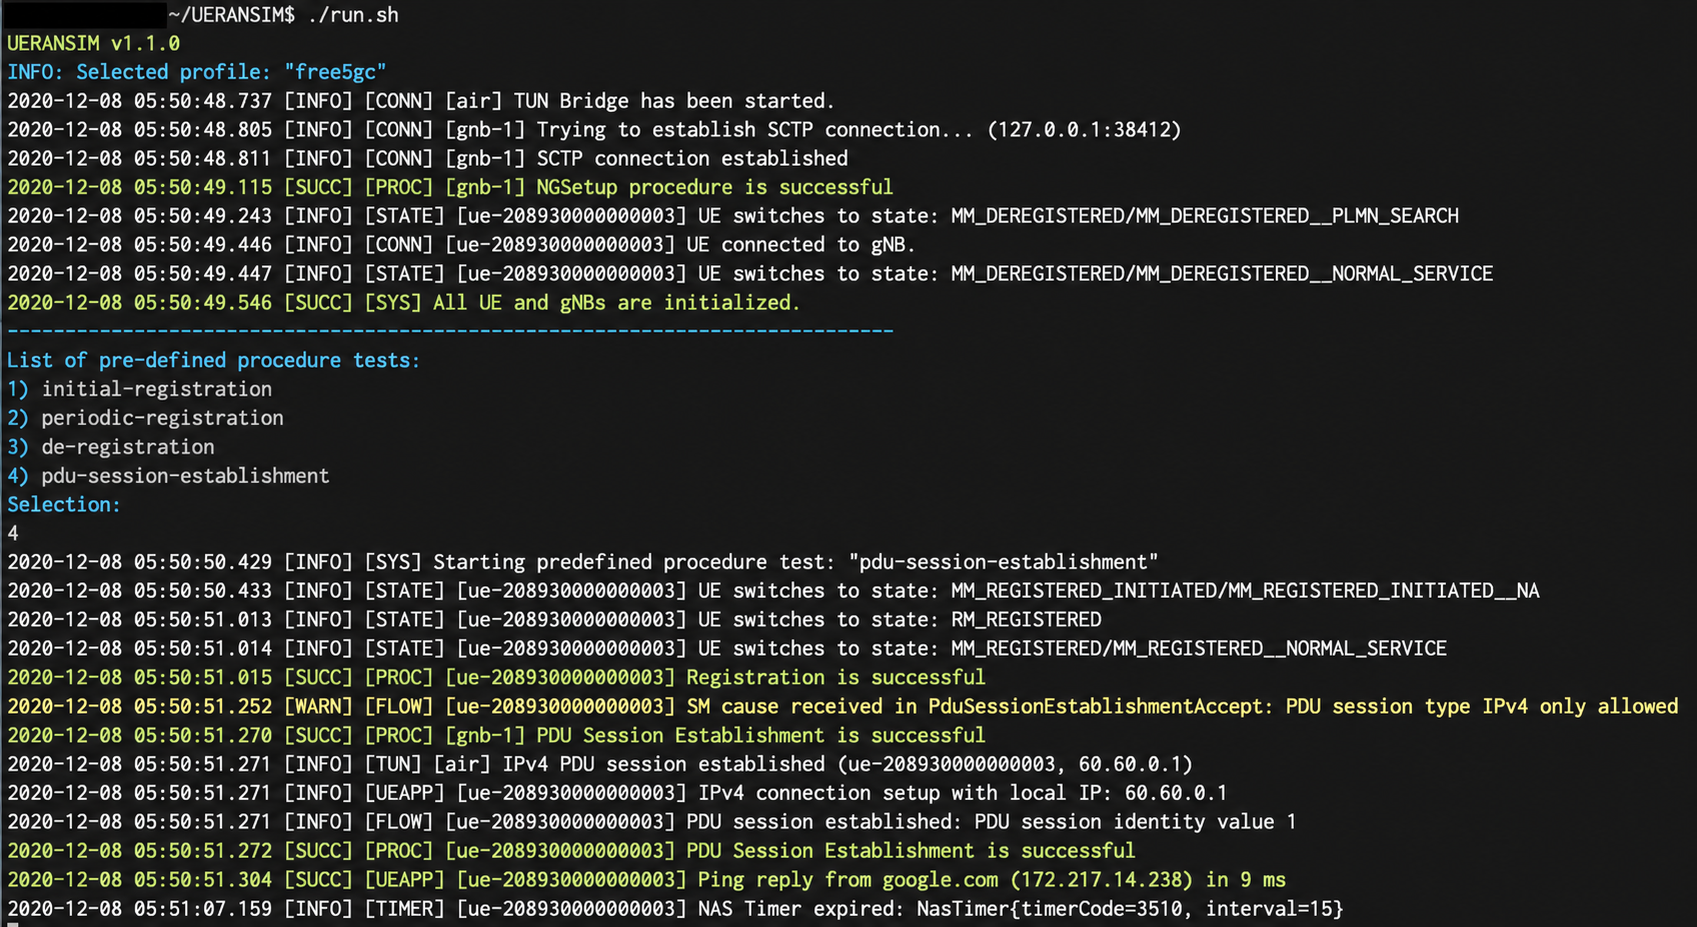
Start UERANSIM and select pdu-session-establishment in its original interface. A message such as Ping reply from google.com was the end-to-end connectivity check in this lab.
That result checks more than process startup: the simulated UE has registered, established its session, and reached the data network through the core.
Inspect the packet path
Once the experiment is running, UERANSIM’s network-interface instructions explain how to send application traffic through the simulated connection. tcpdump or Wireshark can also inspect the GTP-U tunnel packets.
This makes the setup useful for studying the control and user planes together: the web console supplies the subscriber data, the simulator exercises registration and session establishment, and packet capture exposes the resulting transport path.
Thanks for reading. Have a question or a different perspective?
Follow via RSS →